What is a Snelgrove Board?
History of the Snelgrove Board
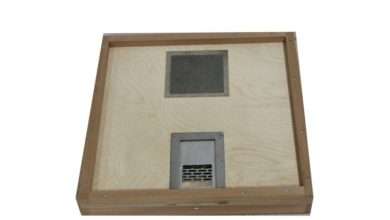
Leonard E. Snelgrove published the first description of the Snelgrove method in his book “Swarming – It’s Control and Prevention” from 1934. It continues decades of hive manipulation that involved separating the queen from the brood using different types of board. In order to “bleed” bees from one box to another, Leonard Snelgrove invented a special type of board with entrances both above and below the board.
The Snelgrove Method
The original purpose of Leonard Snelgrove’s new board was to prevent swarms (much like the demaree method), in which the beekeeper would wait to manipulate the bees until they were nearly ready to swarm. In his work, he does go on to suggest ways for increasing variations that would control swarming.
The use of a Snelgrove board to control swarming is therefore a common topic rather than a single “Snelgrove approach.” In order to regulate swarms, the Snelgrove board can be used in a variety of ways, although the one outlined here is the most basic.
The queen, flying bees, eggs, brood, and nurse bees are temporarily separated from each other in two different brood boxes within the same hive using this technique, which can be used either in advance or after the appearance of queen cells. Upon division of the colony, one box is positioned vertically above the others.
Snelgrove’s original plan was to use his board to give the queen more room to lay her eggs while keeping every bee in the hive healthy and at full capacity, eventually forming a single colony.
Although this modified approach resembles the Demaree approach in some ways, Snelgrove utilizes the board to completely separate the bees, in contrast to the latter which preserves an open structure of the hive where bees (other than the queen) can travel between boxes freely. In spite of this, a piece of mesh in the middle of the Snelgrove board allows the bees’ aroma to still permeate the entire hive.
The Snelgrove board was heavily influenced by other boards that were in use in the late 19th century. Three pairs of entrances were added by Snelgrove, with one entrance above and one below the board in each pair. Newly flying bees could be “bled” back down into the main productive hive by opening and closing the entrances in a specific order.
Only in cases when the beekeeper wants to employ the procedure to raise one or more new queens are the timings of the entrance adjustments crucial.
Keys to Success
The Snelgrove method’s effectiveness depends on the following factors:
• Preparedness (having the necessary extra equipment available in advance) (having the necessary extra equipment ready in advance)
• Identifying the warning indications of an upcoming swarm or doing weekly (7-day) inspections starting in April to look for queen cells
• A queen that has been marked will make it easier to locate and isolate her.
• When the adjustments are performed (if one or more new queen is desired)
Snelgrove Method Schedule
- Day 1
Have drawn comb and/or foundation ready for a second brood box.
Find the queen in the mother colony by removing the roof, supers, etc (hold her in place with a marking cage to prevent losing her during subsequent manipulations).
Remove a few frames from the center of the second box to create a gap, then place it on the old floor.
To make sure there are no queen cells on this frame, place the queen on a frame with an unopened brood in the opening in the second box. Eliminate the marking cage, patch the opening, and reinforce the edge with a spare frame.
Look for any queen cells in the mother box, and remove them all if there are any.
Queen excluder first, then supers, Snelgrove board, mother brood box, crown board, and roof should be added to the hive as it is being rebuilt. Place the Snelgrove board such that the side devoid of an entrance faces the front (same side as the main hive entrance).
Close all other doors on the Snelgrove board before opening the top left one (the flying bees will return to the main entrance at the front of the hive).
- Day 9 or 10 –
Examine the top, mother box for any newly formed queen cells, and then remove all except the best ones so that you can use the remaining ones to build nuclei or a second colony (or remove all if no increase is sought). The bees are currently unable to produce any more queen cells from viable eggs or larvae.
The bottom right and rear top entrances should be left open, while the bottom left and top right entrances should be shut.
What next?
At this point, the colony has undergone three rounds of artificial swarming and flying bee depletion (the initial return of flying bees to the main entrance followed by two manipulations sending bees below the board).
Whether or not the beekeeper wants to grow his or her hives will determine what happens next.
No Increase – If no growth is desired and no development of queen cells was permitted, either:
To create a double brood, move the top box underneath the queen excluder alternatively,
Removing the board will allow the remaining brood to emerge during the following few weeks.
After that, the top box can be taken off.
If a queen is given space to grow and is eventually successfully mated, she can be used to requeen the primary colony by joining the two colonies. It is still advisable to use a piece of newspaper to connect the colonies even though there is a mesh match between them that allows the fragrance to get through. The queen should be left to fly, hence the portals to the Snelgrove board should remain unopened.
Making Increase – The entrances to the Snelgrove board should be left unattended in order for the new queen to emerge if the goal is to raise a new colony from the top box. All new queen cells will have been raised starting on day 2, assuming that all of the original queen cells were eliminated.
Depending on whether an egg or lave was used to divide the hive, any new queen will emerge 14 to 16 days after the first split. After that point, the Snelgrove board’s doors shouldn’t need to be adjusted again. The top box can be moved to create a new, distinct colony after the queen has been mated and has started to lay eggs.
Once the queen cells have matured to the point of being sealed or practically sealed, and most definitely before they emerge, these need to be dealt with if more than one queen cell was left in the top mother box to make up nuclei.
Increases can be made with the help of the Snelgrove board. The removal of the mother colony from the queen frequently results in the development of several emergency queen cells, despite the fact that it can be utilized just to prevent swarming.
The queens that are raised will typically be good ones if the bees swarm naturally. The emergency cells are more likely to produce inferior queens if the treatment is carried out too early in the season.
This approach is offered merely for assistance. The beekeeper should explore and create modifications to fit their preferences after attempting one or more of the main swarm management techniques.
Snelgrove Method 2 (if the colony has queen cells developing):
- 1st DAY.
Combs should be separated and arranged as follows:
In box A: – The queen, in (a). (b) The entire brood with bees that are clinging. (c) Every queen cell.
In box B: – (a) The combs that have bees sticking to them but no brood. (b) One comb of tightly sealed eggs.
In the order listed below, rebuild the hive: – Floorboard, Box B, Excluder, Super, Box A.
- 2nd DAY, (Or if there are sealed queen cells, on the FIRST DAY).
Set the excluder between B and the Super and the screen board beneath A.
Remove wedge number five from the board while keeping the other wedges in place.
- 5th DAY.
Wedge 6 is removed, and wedge 5 is substituted. On the hive’s side, remove wedge number three.
- 7th DAY, (or once all of the queen cells have been destroyed).
From A to B, move the queen along with a frame of brood and bees.
- 21st DAY (or THE 14TH DAY AFTER THE TRANSFER OF THE QUEEN).
Wedge 4 is removed and Wedge 3 is replaced.
Open wedge I on the hive’s opposite side.
It will now be the reign of a new queen. producing eggs on day 35 and mating by day 25.
How to get rid of the new colony in A must now be taken into account.
Included below is a video that shows how to create a Snelgrove board:
Frequently Asked Questions
- What is a Snelgrove board used for?
Snelgrove’s original plan was to use his board to give the queen more room to lay her eggs while keeping every bee in the hive healthy and at full capacity, eventually forming a single colony.
- What is the Snelgrove method?
The queen, flying bees, eggs, brood, and nurse bees are temporarily separated from each other in two different brood boxes within the same hive using this technique, which can be used either in advance or after the appearance of queen cells. Upon division of the colony, one box is positioned vertically above the others.
